


Table of Contents
Table of Contents
TL;DR
Event badge printing, food scanning, and access control can be managed together by assigning each attendee a category and linking that category to their badge type, food entitlements, and access permissions. Once these rules are configured, the attendee’s QR code or badge can be used to print credentials, validate meals, control entry to restricted areas, and record activity throughout the event.
Introduction
At a large event, not every attendee should have the same badge, access, or food entitlement. A VIP may need access to a lounge and VIP dinner, while a delegate may only need access to conference halls and lunch. Speakers, exhibitors, sponsors, media, and staff can all have different requirements. This is where category-based event management becomes useful. Instead of managing badges, meals, and access separately, organizers can connect them to the attendee’s category.
This article explains how to set up category-based badge printing, food scanning, and access control, how these processes work together, and what organizers should consider before and during the event.
What Is Category-Based Event Access Management?
Category-based event access management means giving attendees different permissions and entitlements based on the category assigned to them.
For example, an event may have categories such as:
- VIP
- Speaker
- Delegate
- Exhibitor
- Sponsor
- Media
- Staff
- Student
Each category can be associated with specific rules. These rules can determine what badge the attendee receives, which areas they can enter, which sessions they can attend, and which meals they are entitled to.
An attendee category is more than a label on a registration form. It can become the basis for managing the attendee throughout the event.
For example:
| Category | Badge | Access | Food |
| VIP | VIP Badge | All areas + VIP Lounge | Lunch + Dinner |
| Speaker | Speaker Badge | Main Hall + Speaker Room | Lunch + Speaker Dinner |
| Delegate | Delegate Badge | Conference Areas | Lunch |
| Exhibitor | Exhibitor Badge | Exhibition Area | Exhibitor Lunch |
| Staff | Staff Badge | Operational Areas | Staff Meals |
The exact categories depend on the event, but they should be defined before configuring badge printing, food scanning, and access rules.
Why Categories Matter at Events
Without categories, organizers may have to manually determine whether each attendee is allowed into a particular area or is eligible for a particular meal.
Category-based rules make these decisions more consistent.
For example, instead of asking a staff member to decide whether someone can enter a VIP lounge, the scanning system can check the attendee’s category and permission automatically.
Why is attendee category management an ideal option for events? This is particularly useful when hundreds or thousands of attendees are moving through different areas at the same time.
How to Manage Event Badge Printing by Category
Once attendee categories are defined, the next step is to connect them to badge printing.
A badge can serve two purposes. It identifies the attendee visually and provides a credential that can be scanned at different points during the event.
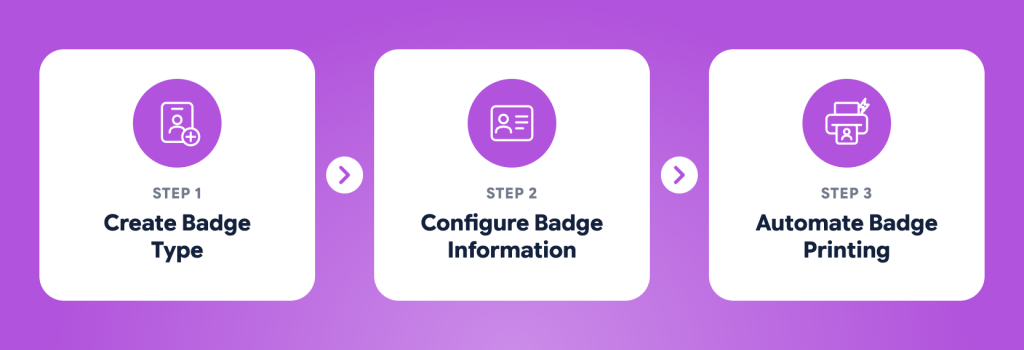
Step 1: Create Badge Types for Different Attendees
Organizers can create different badge templates for different categories.
For example:
- VIP Badge
- Speaker Badge
- Delegate Badge
- Exhibitor Badge
- Sponsor Badge
- Media Badge
- Staff Badge
The badge design can vary by category while still following the event’s overall branding.
For example: A VIP badge might have a prominent VIP designation, while a speaker badge could display the speaker’s name, organization, and role.
This makes it easier for onsite staff to identify attendees visually, while the QR code or barcode provides machine-readable identification.
Step 2: Configure Badge Information
The information printed on the badge should depend on the event’s requirements and attendee category.
Common information includes:
- Attendee name
- Organization
- Attendee category
- Job title
- Photo
- QR code or barcode
- Unique attendee ID
- Event branding
- Access indicators
Important Note: Not every badge needs to contain the same information.
For example, a speaker badge may display the speaker’s designation, while an exhibitor badge may include the company name or booth information.
The important part is that the credential printed on the badge remains connected to the correct attendee record.
Step 3: Automate Badge Printing During Check-In
Badge printing can be connected to the check-in process.
A typical workflow is:
| Workflow Stage | What Happens | System Action |
| Attendee Arrival | Attendee arrives at the registration/check-in counter. | The check-in station is ready to process the attendee. |
| QR Code Scan | Staff scans the attendee’s QR code or registration credential. | System retrieves the attendee record. |
| Attendee Verification | Registration details are matched against the attendee record. | System verifies registration status and attendee information. |
| Category Verification | System identifies the attendee category, such as Speaker, Exhibitor, VIP, or General Attendee. | Category-based credentialing rules are applied. |
| Badge Template Selection | The system determines which badge design corresponds to the attendee category. | The appropriate badge template is selected automatically. |
| Badge Personalization | Attendee information is merged into the selected template. | Name, organization, photo, QR code, and other relevant details are populated. |
| Badge Printing | The personalized badge is sent to the assigned printer. | The badge is printed and issued to the attendee. |
| Credential Activation | The issued badge becomes the attendee’s active event credential. | Associated access permissions and scanning rights are activated. |
This avoids asking staff to manually select a badge type for every attendee.
If the attendee is registered as a speaker, the system can automatically use the speaker badge template. If the attendee is an exhibitor, it can select the exhibitor template.
For large events, this can reduce manual work at registration counters and help maintain consistency.
Read More: Benefits of Switching to On-Site Badge Printing for Events
How Food Scanning Can Be Managed by Category
Food management becomes easier when meal access is treated as an entitlement rather than simply allowing anyone with a valid event badge to collect food.
An attendee may be registered for the event but not entitled to every meal.
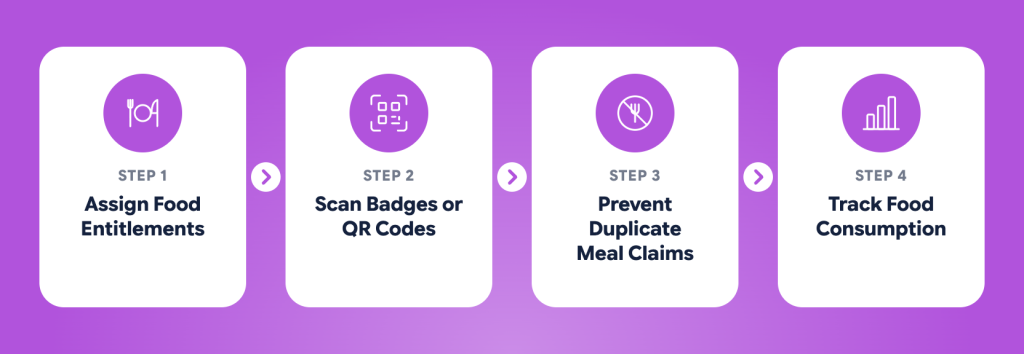
Step 1: Assign Food Entitlements During Registration
Food entitlements can be linked to the attendee category or registration package.
For example:
- VIP – Breakfast, lunch, and dinner
- Speaker – Lunch and speaker dinner
- Delegate – Lunch
- Exhibitor – Exhibitor lunch
- Staff – Staff meals
For multi-day events, entitlements can also be associated with specific dates.
For example:
Day 1: Lunch + Dinner
Day 2: Lunch
Day 3: Lunch + Closing Dinner
This gives organizers more control over catering access and helps ensure that meal availability matches what attendees were actually entitled to receive.
Step 2: Scan Badges or QR Codes at Food Counters
At the food counter, staff can scan the attendee’s badge or QR code.
The system can then check:
- Who is the attendee?
- What category are they assigned to?
- Are they entitled to this meal?
- Has this entitlement already been used?
If the attendee is eligible, the meal can be approved.
Step 3: Prevent Duplicate or Unauthorized Meal Claims
Food scanning can also help prevent duplicate claims.
For example, if a delegate has one lunch entitlement, the first successful scan records that lunch as used.
If the same attendee tries to scan again, the system can identify that the entitlement has already been consumed.
Similarly, if a delegate tries to access a VIP dinner that is not included in their entitlement, the system can reject the transaction.
This creates a distinction between:
Valid attendee and attendee entitled to this particular meal.
That distinction is important for events where different categories receive different hospitality benefits.
Step 4: Track Real-Time Food Consumption
Food scanning can provide organizers with a real-time view of meal usage.
They can monitor information such as:
- Total meals claimed
- Meals claimed by category
- Meals claimed by date
- Meals remaining
- Duplicate scan attempts
- Unauthorized meal attempts
For example, if 2,000 attendees are eligible for lunch and 1,600 have already collected their meals, the catering or operations team has a better understanding of actual consumption. This information can also help event teams identify unexpected demand during the event.
Check Out: How to Manage Badge Printing and Check-In for 1,000–1,500 Attendees
How to Set Up Category-Based Access Control
Food entitlements determine what an attendee can receive. Access control determines where that attendee can go.
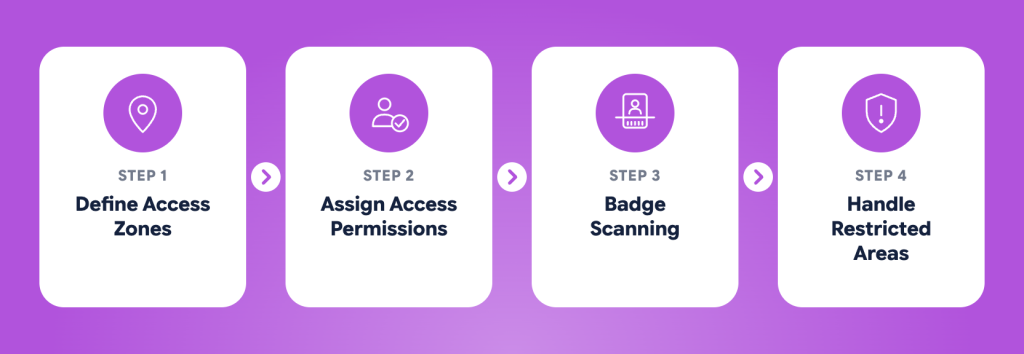
The first step is to define the event’s access zones.
Step 1: Define Access Zones
Access zones can include:
- Main entrance
- Conference halls
- Exhibition area
- VIP lounge
- Speaker room
- Workshop rooms
- Networking area
- Backstage
- Media area
- Staff-only areas
Not every attendee needs access to every zone. The event team should therefore identify restricted areas before configuring the access rules.
Step 2: Assign Access Permissions by Category
Once the zones are defined, assign permissions to each attendee category.
For example:
| Access Zone | VIP | Speaker | Delegate | Exhibitor | Staff |
| Main Entrance | ✓ | ✓ | ✓ | ✓ | ✓ |
| Conference Hall | ✓ | ✓ | ✓ | ✓ | ✓ |
| Exhibition Area | ✓ | ✓ | ✓ | ✓ | ✓ |
| VIP Lounge | ✓ | — | — | — | ✓ |
| Speaker Room | ✓ | ✓ | — | — | ✓ |
| Backstage | ✓ | ✓ | — | — | ✓ |
| Staff Area | — | — | — | — | ✓ |
This permission structure tells the system what each category is allowed to access.
It also makes future changes easier. If all speakers need access to a new speaker room, the organizer can update the speaker category’s permissions rather than modifying every speaker individually.
Step 3: Use Badge Scanning for Entry
Once permissions are configured, the attendee’s badge or QR code can be scanned at an access point.
The system checks the credential against the access rule for that location.
For example:
Delegate scans at conference hall -> Access approved
But:
Delegate scans at VIP lounge -> Access denied
This allows the same badge to work at different access points while applying different rules at each location.
Step 4: Handle Restricted Areas
Restricted areas require clear permission rules and consistent validation.
For example, a backstage area may be limited to speakers and staff. A VIP lounge may only be available to VIPs. A workshop room may only be available to attendees registered for that workshop.
The scanner should therefore validate the attendee against the specific access rule instead of simply checking whether the badge is valid.
This prevents a valid event credential from being treated as an all-access pass.
Also Read: QR Codes vs RFID Badges for Events: Key Differences Explained
How Can One System Manage Badges, Food Scanning and Access by Attendee Category?
An event management system can connect badge printing, food scanning, and access control to the attendee’s category and registration record. Instead of managing these functions separately, organizers can use the same attendee credential to verify identity, access permissions, and food eligibility.
How Do These Functions Work Together?
The process begins when an attendee is assigned a category during registration. That category can determine the badge they receive, the areas they can access, and the food or meal entitlements assigned to them.
During check-in, the attendee’s badge can be printed with relevant information and a unique QR code or other credential. The same credential can then be used at different points across the venue.
At an access point, scanning the badge verifies whether the attendee is allowed to enter a particular area. At a food counter, the credential can be scanned to check whether the attendee is eligible for that meal or food service. The system can record the relevant transaction or usage, giving onsite teams a consistent way to validate entitlements.
Read More: Pre-Printed vs On-Demand Badges: Which Should Event Organizers Choose?
How Can Dreamcast Support This Workflow?
Dreamcast can bring registration, attendee categorization, badge printing, QR-based check-in, food scanning, and access management into a connected event workflow.
For example, when a speaker checks in, the system can identify the attendee category and provide the appropriate badge and permissions. That credential can then be used to validate access to speaker areas and applicable event services.
The same approach can be applied to VIPs, exhibitors, delegates, staff, media, or other attendee groups. If an attendee’s category or permissions change, the organizer can update the attendee record instead of maintaining separate paper lists for different teams.
This is particularly useful when an event has multiple access zones, meal arrangements, or attendee groups. Registration teams, access-control staff, and catering teams can work from consistent attendee information rather than relying on disconnected lists.
The key advantage is that the attendee’s category becomes the link between their badge, venue access, and food eligibility. This makes onsite verification more consistent while giving organizers a clearer record of how credentials and event services are being used.
A practical example of this in action is WCEF 2026, where Dreamcast supported category-based badge printing and access management, helping ensure attendees received the appropriate credentials and access based on their registration category.
Best Practices for Category-Based Event Management
To make badge printing, food scanning, and access management work reliably, organizers should:
- Define attendee categories early: Finalize categories before creating badge templates and access permissions.
- Map every category to specific entitlements: Decide which meals, areas, sessions, and services each category can access.
- Use a unique credential: Connect each badge or QR code to a specific attendee record.
- Keep permissions specific: Avoid giving broad access when an attendee only needs access to certain areas.
- Test every category: Test VIP, speaker, delegate, exhibitor, staff, and other important categories before the event.
- Test both successful and failed scans: Make sure authorized access works and unauthorized access is correctly rejected.
- Track meal usage in real time: Use entitlement tracking to identify duplicate or unexpected food claims.
- Have an exception process: Define who can change attendee categories, add entitlements, replace badges, or resolve access issues.
- Keep attendee data centralized: Badge printing, food scanning, and access control should work from consistent attendee information.
Bonus Tips From Dreamcast’s Marketing Expert- Ayushi Singh
“Don’t treat badge printing, food scanning, and access control as separate onsite tasks. Plan them as one attendee journey. The more clearly you define category-based rules before the event, the less manual intervention your onsite team will need.”
Ayushi Singh, Marketing Expert at Dreamcast
Here are a few additional tips from Ayushi Singh for managing category-based event operations more smoothly:
- Define the permission model first: Map each category to specific access zones, sessions, and meal entitlements before configuring badges.
- Keep one source of attendee data: Keep the category, credential, access permissions, and food entitlements connected to avoid data mismatches.
- Test edge cases: Check scenarios such as duplicate meal scans, expired access, category changes, lost badges, and unauthorized zone entry.
- Plan for peak volumes: Test badge printers and scanners during expected rush periods, not just under normal operating conditions.
- Monitor exceptions: Track denied access and failed food scans so the operations team can identify configuration issues quickly.
- Keep an operational fallback: Have backup devices and a defined manual verification process for connectivity, scanner, or printer failures.
Common Challenges and How to Avoid Them
Incorrect Category Assignment
If an attendee is assigned the wrong category, their badge, food entitlements, and access permissions may also be incorrect.
How to avoid it: Use clear registration rules, validation, and category review before the event.
Duplicate Food Claims
Without entitlement tracking, an attendee may accidentally or intentionally claim the same meal more than once.
How to avoid it: Use real-time scanning and record each successful meal claim against the attendee’s entitlement.
Unauthorized Access
A valid badge does not necessarily mean an attendee should be able to enter every area.
How to avoid it: Configure category-based permissions before the event and test restricted zones with different attendee types.
Long Check-In Queues
Manual badge selection and data entry can slow down the arrival process.
How to avoid it: Pre-configure badge templates and automate badge selection and printing based on attendee category.
Technical Problems
Connectivity, scanner, printer, or device issues can affect onsite operations.
How to avoid it: Keep backup devices, verify internet connectivity, test printers and scanners, and maintain a manual verification procedure for exceptional situations.
Conclusion
Managing badge printing, food scanning, and access control does not have to mean maintaining three separate operational systems.
A category-based approach connects the attendee’s identity with their badge, permissions, and entitlements. Once those rules are configured, the same credential can support venue check-in, restricted-area access, meal validation, and attendance tracking.
The practical workflow is simple:
- Define categories
- Assign permissions and entitlements
- Configure badge templates
- Automate badge printing
- Scan meals
- Control access
- Monitor attendance and activity
For organizers, the goal is not just to print badges or scan QR codes. It is to create a controlled attendee journey where the right person receives the right credential, accesses the right areas, and receives the services included in their registration.
FAQs
Organizers can assign badge templates to attendee categories such as VIP, speaker, delegate, exhibitor, or staff. During check-in, the system identifies the attendee category and automatically selects the appropriate badge template for printing.
Yes. A badge with a unique QR code or barcode can be used as a shared credential for venue entry, restricted-area access, and food entitlement validation, provided the event system supports these functions.
Category-based access control links attendee categories to specific access permissions. For example, VIPs can be given access to a VIP lounge, while delegates may only access conference halls. The attendee’s badge is scanned at each access point to validate the permission.
Organizers can assign specific meal entitlements to attendees and record each successful food scan. When the same attendee scans again for a meal that has already been claimed, the system can flag or reject the duplicate attempt.
Yes. Organizers can configure different food entitlements for different categories. For example, VIPs may receive lunch and dinner, while delegates may receive lunch only. Entitlements can also be configured by event day or meal type.
The organizer can update the attendee’s category and associated permissions in the event system. Depending on the setup, the attendee may need a new badge so that the physical credential matches the updated category.
Large events can use pre-configured badge templates, QR-based registration lookup, and automated badge selection. This allows the system to identify an attendee and print the correct category-specific badge without manually entering their information.
Organizers should test every major attendee category at each relevant access point. They should verify successful access, rejected access, meal entitlements, duplicate food scans, badge printing, and category changes before the event begins.
Simplify Event Planning Hassle-Free