TL;DR
An event microsite is a dedicated website for a specific event. It brings essential information, such as the event agenda, speakers, venue, registration, and updates, into one place. It can help organisers build a distinct event identity, make information easier to find, and understand how visitors interact with the event page. This guide explains what an event microsite is, its benefits and features, and how to create one step by step.
Introduction
An event may have an exciting theme, popular speakers, and a great schedule, but people may still wonder, “Where can I find all the event details?”
The event announcement might be on Instagram, the speaker list in an email, the schedule in a PDF, and the registration link on another page. People have to look in different places just to understand what the event is about and how to attend.
An event microsite solves this problem by bringing everything together in one place. Visitors can find event details, check the schedule, learn about the speakers, and register without searching across different platforms. Connecting the microsite with an event registration system can also make it easier for visitors to complete the sign-up process.
The opportunity to make this information accessible online is significant in India. According to the Press Information Bureau’s report on Indian telecom services, India had 1,092.79 million internet subscriptions at the end of March 2026. This counts subscriptions, not unique individuals or potential event attendees, so it does not predict event registrations. It does, however, show the scale of the country’s internet connectivity.
A microsite alone cannot guarantee more registrations or a successful event. Its value comes from how well it serves your audience: making information clear, answering common questions, and helping visitors take the next step. Let’s look at what an event microsite is, what makes it useful, and how to create one that works for your event.
What Is an Event Microsite?
An event microsite is a dedicated website built around a particular event, rather than an organization’s entire business. It gives the event its own online identity and brings together the information visitors need before, during, or sometimes after it takes place.
For example, imagine you’re organising a two-day business conference. Your company website may explain your services, team, and business history, but potential attendees visiting the conference microsite are looking for something different.
They want to know:
- What is the conference about?
- Who will be speaking?
- Which sessions are planned?
- When and where is it taking place?
- How can they register or book a ticket?
- Whom should they contact if they have questions?
The microsite can answer these questions on a single page or across several connected pages, depending on the event’s size and complexity.
A small workshop may need only an overview, a date, a venue, and a registration form. A large conference or trade show may need a detailed agenda, speaker profiles, exhibitor information, travel instructions, and FAQs.
The key difference is its focus. A company website explains the organization; an event microsite explains the event. Its content and layout should help visitors understand the event and find the information or action they came for.
Benefits of Building A Microsite For Events
There are plenty of benefits, and to make you aware of them all in one place, we have compiled them all in one place;
Improved Event Branding
The microsite will help you convert your event into a brand that has different horizons that might be different from your parent organization. We are talking about the theme. A charm of uniqueness will be added, as it can be theme-based. For instance, you can’t change your company website theme for many restricted reasons, but you can make a custom event microsite.
Enhance Messaging to Targeted Audience
A microsite is a short yet effective medium that is tone-focused and only talks about the crucial elements of your event. The user will only see and read the message that you want to give without any here-and-there content type. It means event-specific content only.
Easy to Set Up
Undoubtedly, it is easier to build a custom event microsite. For big corporations and companies. It is necessary to build one that has pre-decided annual events scheduled or has a legacy of hosting such events. These event microsites can be reused year by year and can be updated with new ones as you require while keeping the core elements of the event the same.
Content-Centric
A company website is usually exploded with lots of content about the projects, services, and a lot more. But a microsite is usually content-centric to the event only. This allows the user to only grab the useful information about the event that they are looking for instead of digging deeper into some other sort of information.
Data Tracking
Every event has some success measure, and with the help of such an event microsite. You will be able to track and analyse all sorts of information from the backend. Metrics like how many users have registered and how your promotions are going.
Enhance Your Event Microsite SEO
Relevant keywords with unique URLs have a high chance to rank well over web pages and make it possible to come across them when any user searches for them.
Besides that matter of fact that it offers, in general, to look more professional and to appear in a more approachable way. Building a microsite is preferred. As it partners with your promotions, for instance, when you promote your event over social channels, paid promotions, or over email, adding the link to the microsite enhances the possibility of getting more people registered. Its laser-focused content makes it event-specific, which fulfils many objectives.
Essential Features of an Event Microsite
The features you need depend on what you’re organising. A small networking meet-up does not need the same setup as a multi-day conference or a trade show. The aim is to include everything visitors need to understand the event and take the next step, without overwhelming them with unnecessary information.
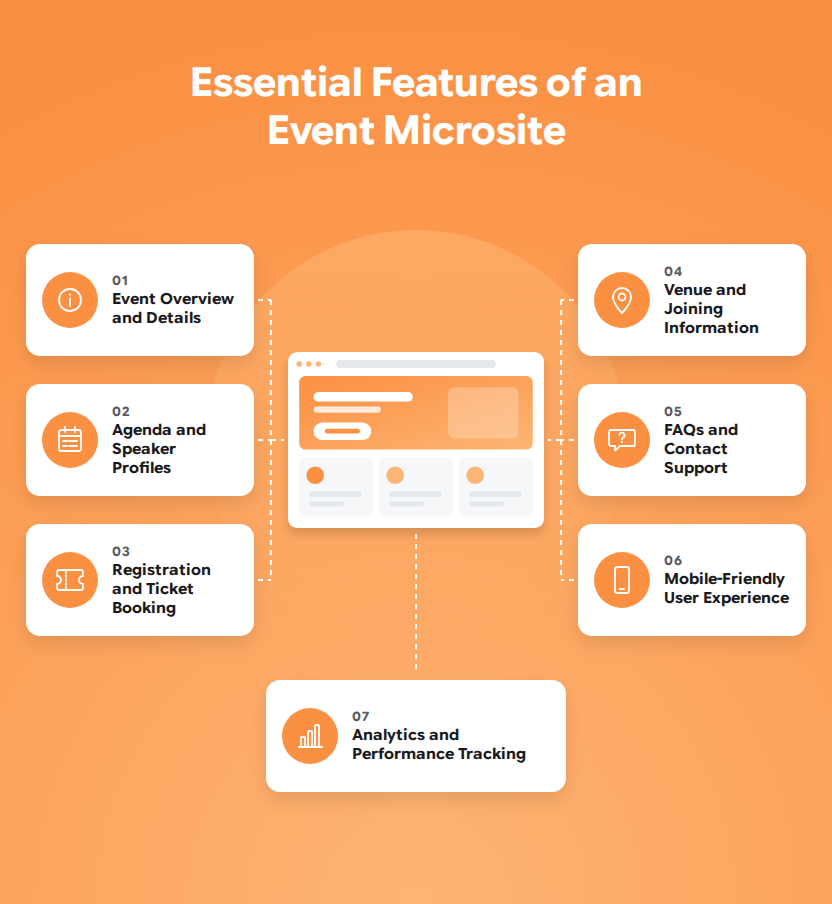
1. Event Overview and Key Details
Start with the basics. Visitors should be able to understand what the event is, who it is for, and when and where it is happening without searching through the page.
Include:
- Event name and purpose.
- Date, time, and duration.
- Venue or online format.
- Intended audience.
- Main themes, activities, or reasons to attend.
Keep the opening description clear and specific. Instead of saying an event will be “informative and engaging,” explain what attendees can learn, experience, or take away from it.
2. Agenda, Speakers, and Activities
People often want to see what they will get out of an event before committing their time or money. A clear agenda helps them decide whether the event matches their interests.
Include session timings, topics, speaker names, and relevant activities when those details are confirmed. For multi-day events, organise the schedule by day. For trade shows, highlight exhibitions, demonstrations, or other activities visitors may want to plan around.
If the schedule changes, update the microsite promptly. An outdated agenda can confuse and create extra work for your event team.
3. Registration and Ticketing
Make registration easy to find. Use a clear call to action, such as Register Now, Book Your Ticket, or Reserve Your Seat, and place it where visitors can see it without searching.
Keep the form focused on information you genuinely need. Explain required fields clearly, and test the full process so visitors can submit their details without unnecessary steps.
If your event needs online registration, ticket booking, attendee categories, or registration management, explore Dreamcast’s event registration platform. Check the available capabilities against your event requirements before choosing a solution.
4. Venue, Access, or Online Joining Information
Make it easy for attendees to understand how to reach the venue or join the event online. The details you provide should match the event format.
| Event format | Information to include |
| In-person | Venue address, directions, parking or transport details, entry instructions, and check-in timings |
| Virtual | Joining instructions, session timings, access requirements, and technical guidance |
| Hybrid | Physical venue details, online joining instructions, and any differences between the in-person and virtual experiences |
For events with special access arrangements, include relevant accessibility information. For virtual events, make joining instructions easy to locate before the event starts.
5. FAQs and Contact Information
Even a detailed event page may not answer every question. An FAQ section can cover common queries about registration, cancellations, tickets, venue access, joining instructions, certificates, or other event-specific policies.
Keep the answers short and accurate. Add a suitable contact email address or support channel for questions that need a personal response.
This also gives your team a chance to address common concerns before they turn into repeated enquiries.
6. Mobile-Friendly Design
Someone may open your event microsite from a phone while reading an invitation, browsing social media, or travelling. If the page is difficult to read or the registration button is hard to tap, finding information becomes unnecessarily frustrating.
Make sure that:
- Text is readable without zooming in.
- Buttons are easy to tap.
- Forms work on smaller screens.
- Images display correctly and do not slow the page unnecessarily.
- Visitors do not have to scroll sideways to read content.
Test the microsite on both mobile and desktop devices before launch. Do not assume it works well on mobile just because the desktop version looks good.
7. Analytics and Performance Tracking
If you want to understand whether your microsite is supporting your event goals, decide what to measure before you launch it.
Depending on your analytics setup, useful metrics may include:
- Page visits: How many visits the microsite receives.
- Traffic sources: Where visitors come from, such as email, social media, search, or paid campaigns.
- Registration-button clicks: How often visitors click through to sign up.
- Completed registrations: How many people finish the registration process.
- Form abandonment: How often visitors leave before submitting their details.
These metrics can help you identify what needs attention. For example, plenty of visits but few registration clicks may suggest that the event’s value or the next step is not clear enough. Many registration clicks but few completed forms may indicate friction in the sign-up process.
Analytics will only show what your tracking setup captures, so configure it properly and interpret the numbers in the context of your event goals.
How to Create an Event Microsite: Step by Step
You do not need to begin by designing every page. Start by deciding what the microsite needs to achieve, then build the content and layout around your audience’s needs.
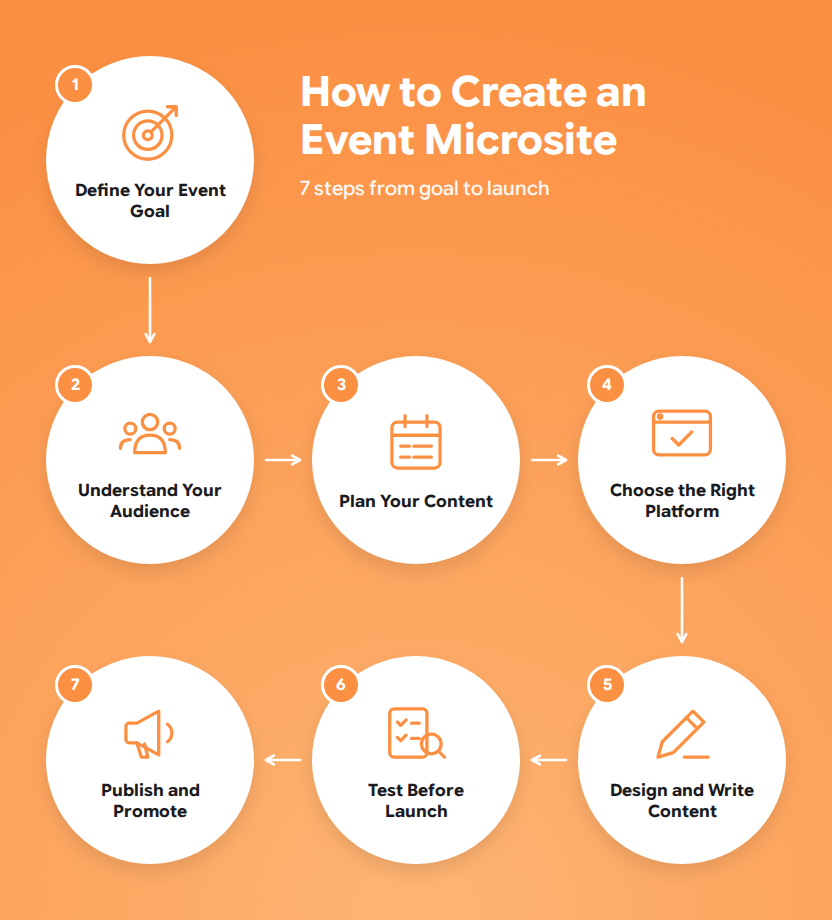
Step 1: Define the Event Goal
First, decide what you want the microsite to help you achieve. Is your priority to collect registrations, sell tickets, promote a product launch, share a conference agenda, or provide information to guests?
Your goal will influence the page structure, content, calls to action, and metrics you track.
For example, a paid conference may need clear ticket options and payment information. An invitation-only business meeting may need an event overview, an RSVP form, and joining instructions.
Before moving ahead, write down:
- The main purpose of the microsite.
- The primary action visitors should take.
- The metrics you will use to evaluate performance.
Step 2: Understand Your Audience
Think about who will visit the microsite and what they need to know before deciding to attend.
A conference attendee may want to review the agenda and speakers. A trade show visitor may need opening hours, exhibitor details, and directions. Someone attending a virtual event may need simple joining instructions and information about the sessions.
List the questions your audience is likely to ask. Arrange the page so the most important answers are easy to find.
Step 3: Plan the Content and Page Structure
Before choosing a design, list the information your microsite needs. This helps you identify missing details and prevents you from adding sections that do not serve a clear purpose.
Use this simple content plan as a starting point:
| Page or section | Purpose |
| Event overview | Explain what the event is and why people may want to attend |
| Agenda | Show session timings, topics, and activities |
| Speakers | Introduce confirmed speakers and their roles |
| Registration | Help visitors sign up or book tickets |
| Attendee information | Explain venue access or online joining |
| FAQs and contact | Answer common questions and provide support |
A small event may fit all this information on one page. A larger event may need separate pages for the agenda, speakers, and attendee information.
Only publish details that are confirmed. If a speaker or session is still being finalised, avoid presenting it as definite.
Step 4: Choose the Right Platform
Choose a platform that suits the event you are organising and the work your team needs to manage. Consider how easily you can update content, whether the registration process meets your requirements, how the microsite performs on mobile, and what reporting options are available.
If registration is a major part of the visitor journey, look for a platform that supports your requirements without adding unnecessary complexity. An event registration system should fit your registration process and work smoothly with the microsite.
You can review Dreamcast’s event registration platform features to assess whether its available capabilities match your needs. Compare the actual features with your requirements before making a decision.
Step 5: Design the Microsite and Write the Content
Use the event’s branding consistently, including its logo, colours, imagery, and typography. The design should give the event a recognisable identity while keeping the information easy to read.
A practical page layout could follow this order:
- Event name and key details: Tell visitors what the event is and when and where it takes place.
- Event overview: Explain what attendees can expect and why the event may be relevant to them.
- Agenda and speakers: Give visitors the information they need to assess the programme.
- Registration button: Make the next step clear and easy to find.
- Attendee information and FAQs: Answer practical questions and explain how to get support.
Write in short paragraphs and use headings that describe what each section contains. Avoid vague buttons such as “Click Here” when a direct label like “Register for the Event” explains the action more clearly.
Step 6: Test Everything Before Launch
A microsite may look ready on your laptop but still have problems on a phone, a form, or a registration page. Test the complete visitor journey before sharing the link publicly.
Pre-launch checklist
- Event name, date, time, and location are correct.
- Agenda and speaker details are up to date.
- Registration or ticket-booking buttons work.
- Forms accept valid entries and explain errors clearly.
- Confirmation messages appear as expected.
- Pages work on mobile and desktop.
- Images and links load correctly.
- Venue or online joining instructions are easy to find.
- Contact details and FAQs are accurate.
- Analytics or campaign tracking is configured, if required.
If possible, ask someone who has not worked on the microsite to test it. A fresh visitor may notice unclear wording or missing information that your team has overlooked.
Step 7: Publish, Promote, and Update It
Once everything is tested, publish the microsite and share it through the channels your audience uses. These may include email invitations, social media, paid campaigns, partner communications, or your organization’s main website.
Use the same official link across your promotions so visitors can find the latest information in one place. If you are running multiple campaigns, suitable tracking links can help you understand which channels are bringing visitors and registrations.
Keep the microsite updated after launch. If a speaker, session time, venue instructions, or registration details change, update the page so attendees are not relying on outdated information.
You can also use the microsite after the event to share follow-up information when relevant, such as recordings, resources, or details about future editions.
How to Make Your Event Microsite More Effective
Publishing a microsite is only the starting point. Its usefulness depends on how clearly it presents information, how easily visitors can take action, and whether you use the available data to make sensible improvements.
Make Information Easy to Find
Use clear page titles and headings that describe the content. Include relevant terms naturally, such as the event name, location, year, or subject, wherever they help visitors understand the page.
Avoid repeating keywords simply to influence search rankings. Google’s SEO Starter Guide explains how useful, understandable content and a well-organised website can help search engines discover and interpret pages.
Remember that a dedicated microsite is not automatically guaranteed to rank well. Search visibility depends on factors such as content quality, relevance, accessibility to search engines, and competition.
Keep Registration Simple
Review every field in the registration form and ask whether it is necessary. If you do not need a detail to complete registration, consider whether it can be collected later.
Make required fields clear, explain the next step, and test the form on mobile devices. A straightforward registration journey makes it easier for visitors to complete the process without unnecessary confusion.
Track Results and Improve the Page
Choose metrics that match your original goal, then review them while the event is being promoted.
| Metric | What it helps you understand |
| Page visits and traffic sources | Where people discover the microsite |
| Registration-button clicks | Whether visitors are interested in signing up |
| Completed registrations | How many visitors finish registration |
| Form abandonment | Whether people leave before submitting the form |
| Mobile usability | Whether the page is comfortable to use on a phone |
Use the results to investigate specific problems. If visitors reach the microsite but do not click the registration button, review whether the event’s value and call to action are clear. If many click through but few finish the form, test the registration process for unnecessary steps or confusing fields.
Do not judge performance by page visits alone. The right measure depends on the purpose of your event microsite.
Create an Event Microsite That Makes Attending Easier
An event microsite should do more than look good. It should help people understand the event, find important details, and register without confusion.
Start by deciding what you want the microsite to achieve. Organise the information so visitors can quickly find what they need, and include only the features your event requires. Before launching, test the registration process, keep event details updated, and check the results to see what can be improved.
Dreamcast offers event registration solutions that can help organisers manage registrations and make event information easier for attendees to access. Explore the available options and choose what best fits your event’s needs.
When everything is clear and easy to find, your microsite helps attendees get the information they need and makes it easier for your team to communicate event details.
FAQs
An event microsite brings event details, promotion, and registration together in one place, so visitors can easily find information and sign up.
It should include the event date, venue, agenda, speaker details, registration link, and contact information. Add online joining instructions for virtual events.
Yes. It can share session schedules, speaker profiles, registration details, joining links, and technical instructions to help attendees prepare.
No. Small events may only need a page on an existing website. A microsite is more useful when an event needs dedicated branding, detailed information, or a separate registration journey.
Track page visits, registration clicks, completed sign-ups, and traffic sources. These metrics help show whether the microsite is attracting visitors and turning them into registrants.